Wireguard是什么
WireGuard是一种现代虚拟私有网络技术,它利用最新的加密技术,基于UDP协议传输数据。比其他流行的异地组网解决方案,例如IPsec和OpenVPN相比,WireGuard更快,更易于配置并且占用空间更小。且它是跨平台的,几乎可以在任何操作系统运行,包括Linux,Windows,Android和macOS。
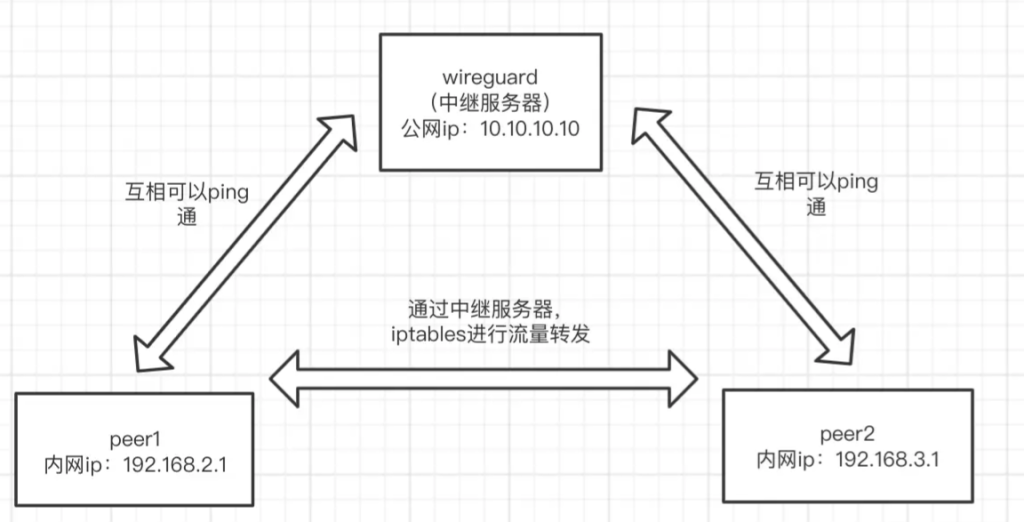
与OpenVPN等采用了C/S架构异地组网方式不同,WireGuard能根据配置,组网双方都可以充当传统的服务器或客户端。
服务器端搭建
我们将有公网ip的服务器当做Wireguard中继服务器,并确定Wireguard监听51820端口。中继服务器的搭建有以下步骤:
安装Wireguard
我这里是ubuntu系统,Wireguard支持多平台,安装方法不一致,详细看最后的文档。
sudo apt update && sudo apt install wireguard
生成公私钥
sudo mkdir /etc/wireguard
cd /etc/wireguard
wg genkey | sudo tee privatekey | wg pubkey | sudo tee publickey
编写WireGuard配置文件
创建 WireGuard 配置文件 /etc/wireguard/wg0.conf:
sudo vim /etc/wireguard/wg0.conf在文件中添加以下配置:
[Interface]
PrivateKey = <服务器私钥>
Address = 10.0.0.1/24
ListenPort = 51820

[Peer]
PublicKey = <客户端公钥>
AllowedIPs = 10.0.0.2/32

[Peer]
PublicKey = <客户端公钥>
AllowedIPs = 10.0.0.3/32
其中 <服务器私钥> 是上一步生成的服务器私钥,<客户端公钥> 是客户端的公钥。有多少个客户端配置就得添加多少个Peer节点。AllowedIPs字段是客户端连接时允许访问的服务器中的子网段。
启动wireguard
sudo wg-quick up wg0可以使用以下命令查看 WireGuard 状态:
sudo wg show客户端搭建
客户端搭建的话,就相对简单。由于Wireguard是都可以充当服务器和客户端的,所以当我们在客户端使用的时候,安装、生成公私钥和启动都是跟服务器一样的流程,只是不同平台的GUI界面操作不一样。
安装Wireguard
同服务器搭建流程
生成公私钥
同服务器搭建流程
编写WireGuard配置文件
相比服务端搭建,主要在于配置文件的内容不一致。首先在任意位置创建好WireGuard 配置文件wg0.conf
在文件中添加以下配置:
[Interface]
PrivateKey = <客户端私钥>
Address = 10.0.0.2/32
DNS = 8.8.8.8

[Peer]
PublicKey = <服务器公钥>
AllowedIPs = 0.0.0.0/0
Endpoint = <服务器IP>:51820
其中 <客户端私钥> 是上一步生成的客户端私钥,<服务器公钥> 是服务器的公钥,<服务器IP> 是服务器的 IP 地址。
启动 WireGuard
同服务器搭建流程